Thanks for your Purchase!
We know you are excited to install your new product but we advise you to please fully read the instructions BEFORE you start to work on your vehicle.
If you are not comfortable after reading these instructions, we suggest you take your car to your nearest qualified mechanic.
HEAT SHIELD INSTALLATION:
Our heat shields are an option with our intake system, we highly recommend them, however we have chosen them as an option in order to allow our customers to upgrade their car in stages.
First of all you are going to need basic tools.
10mm socket and extension with a ratchet or bar.
T30 Torx wrench.
5mm allen wrench.
hobby knife or sharp blade.
If you haven't already, remove the factory air boxes and inlet tubes.
- With the knife, cut the shield as shown to allow the plug on the fuel rail to protrude.

- Here are the mount locations for the shields. With your M10 socket remove the nuts at the front of the factory turbo shield. Make sure they do not fall into the valley!! Remove the factory torx bolts that secure the loom on both these locations also.

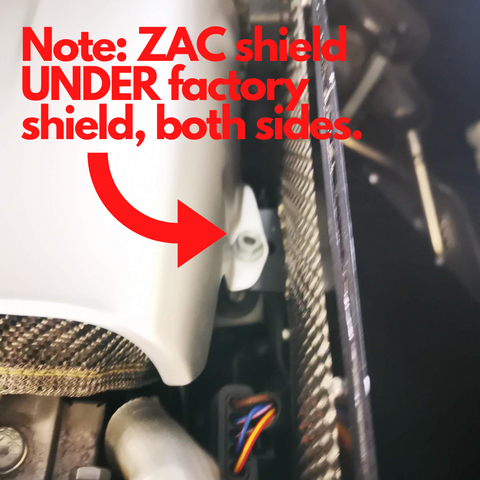
- The heat shields locate on the factory turbo shield standoffs. lift the turbo shield slightly and place the heat shield tab over the standoff as shown. Repeat this for both sides (you will need to lift the loom on the RH side to access) Thread the nuts back on DO NOT FULLY TIGHTEN yet
- Now mount the air pressure sensors in the shields as shown. The air pressure sensors originally measured how dirty the factory air filter was using vacuum. These are not longer required for that purpose, but they still measure ambient air pressure.


- Now secure the RIGHT side shield using the supplied bolt and M5 Allen wrench.DO NOT TIGHTEN yet, just get the thread started.

- Now use the FACTORY BOLT and T30 Torx wrench to secure the LH side shield.

- Check that everything is sitting in position and you have not pinched any wires or hoses. The factory turbo shield springs and flexes quite a lot. use the slots in the heat shields to get them sitting straight. Now tighten the 2 M10 nuts, and the bolts both sides little by little. There is no need to overtighten!
- Now place the factory cold air inlets into position.

- YOU ARE DONE! Now install, or re-install your ZAC air intakes. ENJOY!
Please note ZAC, it’s directors, shareholders or subsidiary companies accept no responsibility whatsoever for any damage to your car, it’s components or yourself. Please check with your local authorities if this product is legal before fitment.