Thank you so much for purchasing our ZAC manifolds!
These intake manifolds are designed to suit W205 C63 only. For GLC63 and other models please contact us.
PLEASE TAG US ON SOCIAL MEDIA @zacmotorsport Unboxing, installing, pics and vids WE LOVE IT AND APPRECIATE IT!
Any photos in these instructions can be enlarged by right clicking the photo and selecting (open image in new tab), you may also want to download them. If you need, we can also send you PDF version.
Please note: these manifolds must be installed by a ZAC certified mechanic! Contact us before commencing any further if you have any more concerns!
These manifolds may require modifications to your vehicle
Fitment of the manifolds require ENGINE REMOVAL!
BEFORE REMOVING ANY PARTS FROM THE CAR PLEASE READ!
Pre Assembly is required. Do this BEFORE you start the engine removal process to avoid unnecessary time delays with a disassembled car.
- Check you have EVO1 or EVO2 manifolds, here is the easiest way to tell. First evolution has an extra port, removed for second evolution.

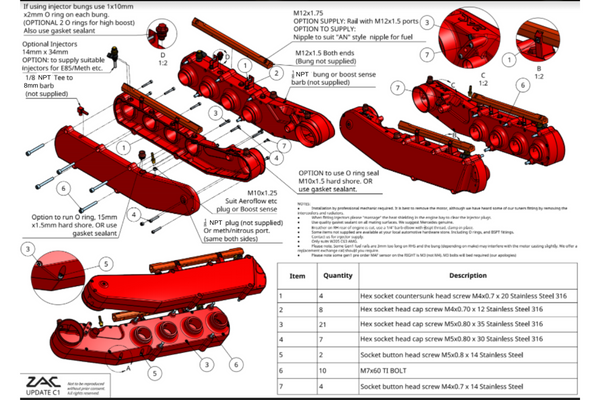
- Check you have all bolts and fittings. Dummy assemble the manifolds (no sealant) noting the bolt lengths from different areas of the manifolds. (schematic bolt list should be in packaging, and also below please review)


- EVO1 Schematic

- Make sure you have the correct model manifold for your car. PRE FACELIFT & FACELIFT ARE DIFFERENT!

- Make sure all bolts are the correct length, do this by first dropping the bolts into the holes

- After you have dummy assembled the manifolds, please apply a quality Adhesive style gasket sealant such as is offered from Loctite etc to the 2 halves. We provide a ridge and recess in each half that should be filled with sealant so as to provide a sealed barrier to combat pressure. Now torque bolts moving your way around the manifold, top, bottom, left right, little by little, final torque of at least 5Nm is suggested. There is an option on evo1 and 2 C63 manifolds to add O ring seal to the manifold halves (1.6mm), You can also add O ring seals to the MAP and breather ports as well as extra O rings to the injector plugs. (refer schematic).
- Check you have ALL 10 M7 Titanium bolts, to mount the manifolds to the head.

- Assemble the injector plugs (if not using port injection) O rings are 10mmID x 2mm. Also use gasket sealant on all ports and threads.

- Assemble the 1/8NPT plugs (or barbs if using boost sensing or RPA etc)

- If running injectors we suggest you solder and pot the wiring direct to the injector rather than use plugs (as shown in our photos). We also suggest heat shrink wrapping the wiring.

- Also not in the photo above, replacing the vacuum hose (5/16" or 8mm) with the 1/8NPT elbow barb (supplied with EVO2, for EVO1 we can also supply if needed). Note the hose must run between the rail and the head.
- WE SUGGEST YOU PURCHASE GENUINE REPLACEMENT MANIFOLD O RINGS before removing the engine from the car. Have them ready just incase.
- You now have the manifolds pre assembled. it is time to remove the engine. Refer to Mercedes documentation for this procedure.
- With the engine removed, remove the factory manifolds.
- Remove the factory O rings and inspect. Re-use or replace as you prefer (we suggest new is always best)
- Remove MAP sensors, and bolt both into the new manifolds. Note EVO1 manifolds only, the left side (in direction of travel) MAP sensor is very close to the throttle body clamp hose. See procedure below

- Remove the factory vacuum hose on the Right side rear factory manifold near the check valve, replace with the supplied silicone vacuum hose. This plugs into the 5/16 (8mm) elbow barb (supplied with the Evo2 kit as mentioned earlier)
- Lubricate all O rings including the ones on the breathers neat the throttle bodies.
- Make sure all O ring seals for each cylinder are lubricated and sitting on the new ZAC manifolds. now carefully place the manifold up to the head, locating the throttle body and breather ports.
- Coat with suitable anti-seize and screw in lightly some of the supplied M7 bolts NOTE. The middle top bolt is offset, THIS IS NORMAL. The head thread is not in line with the other 2 holes either.

- Work your way around the manifold bolts, taking the time to bring the manifold into the head EVENLY! If you turn one manifold head bolt too much it will cock the manifold. This can cause the O rings to pinch.
- The manifolds will come home to the head, it can take some torque! Remember you are compressing the O ring port seals so we do not want leaks. If you have a small (less than 0.5mm) gap between the head and manifold and feel the compression on the O rings and bolt torque is ok, then it is ok to have a small gap. We also can supply 0.9mm stainless shims if required (contact sales@zacmotorsport.com)
- On the Left side (in direction of car travel, so drivers side in USA) there are some coolant lines that may need to be manipulated under the manifold, these are flexible hoses. They are a tight fit.
- The coolant hardline might be close to the rear of the manifolds on some cars. It seems to not depend on year, just variation in bending. The fix is easy though, simply use a trim tool or something else (plastic) between the manifold and the tube, and bend the tube so slightly so there is some clearance (as shown)

- Now you have both manifolds in place it is time to smoke test the engine. We suggest you smoke through the turbo silicone inlet. And you remove the top vacuum sensor plug on both manifolds to make sure smoke is going all through. Once it exits that port, fit it back on and continue checking for leaks. Do this BEFORE fitting the engine back to the car.

- With everything installed it is time to fit the engine back into the car, and enjoy the extra flow and other benefits of our billet manifolds!
Please note ZAC, it’s directors, shareholders or subsidiary companies accept no responsibility whatsoever for any labor costs, damage to your car, it’s components or yourself, or fines, legal costs of any type.. Please check with your local authorities if this product is legal before fitment.